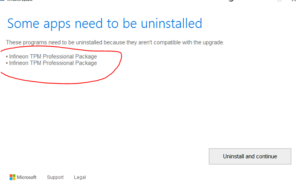
If it doesn’t go through the update and get stuck ( my case it was 30% ) then error out. HP 8100 / 8200
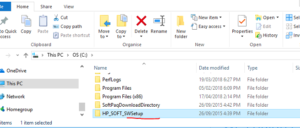
If there is no programs to uninstall, then rename folder
Just me

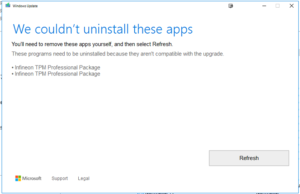
If it doesn’t go through the update and get stuck ( my case it was 30% ) then error out. HP 8100 / 8200
If there is no programs to uninstall, then rename folder
For my future reference – force AD sync to o365
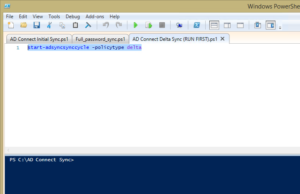
1 # start-adsyncsynccycle -policytype delta
2 # start-adsyncsynccycle -policytype Initial
3 #
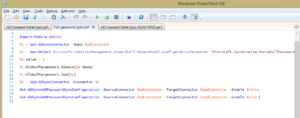
$adConnector = “exampledomin.com”
$aadConnector = “exampledomain.onmicrosoft.com – AAD”
Import-Module adsync
$c = Get-ADSyncConnector -Name $adConnector
$p = New-Object Microsoft.IdentityManagement.PowerShell.ObjectModel.ConfigurationParameter “Microsoft.Synchronize.ForceFullPasswordSync”, String, ConnectorGlobal, $null, $null, $null
$p.Value = 1
$c.GlobalParameters.Remove($p.Name)
$c.GlobalParameters.Add($p)
$c = Add-ADSyncConnector -Connector $c
Set-ADSyncAADPasswordSyncConfiguration -SourceConnector $adConnector -TargetConnector $aadConnector -Enable $false
Set-ADSyncAADPasswordSyncConfiguration -SourceConnector $adConnector -TargetConnector $aadConnector -Enable $true
Ran into this issue today –
First, I tried :
Search for and open “Activity Monitor” then close all of the Adobe applications in Activity Monitor.
Search for and open “Finder” , click on Go tab and select > Go to Folder.
Location 1: In the box type ~/Library/Application Support.
Location 2: In the box type ~/Library/Preferences.
Location 3: Documents folder
Renamed the ‘Adobe‘ folders to ‘OldAdobe‘
Launch Premiere Pro, accept the License Agreement and see if it works.
Note: You will lose your customized workspaces and keyboard shortcuts.
This didn’t work for me 🙁 but doing the following did 🙂
Open finder > Go tab > Go to Folder
Type “~/Library” and click Go.
Go to /Library/Caches/Adobe/Premiere Pro/12.0
Delete the “Typesupport” folder
Then Premiere opened and stayed open and loaded.

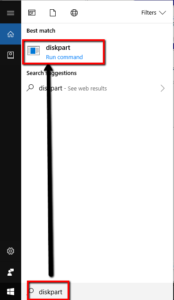
Press “Windows Key + R to open the run dialogue box,
Type“diskpart” and double click “Diskpart – run command” to open a command prompt window.
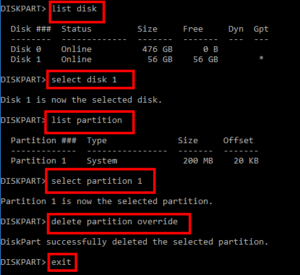
Type “list disk” > Enter
“select disk n” ( where n = disk number ) > Enter
Type “list partition” to display all the volumes on the hard drive.
Type “select partition n” ( n stands for the volume ).
Type “delete partition override” to remove the EFI partition.
Type “exit” to close the diskpart window

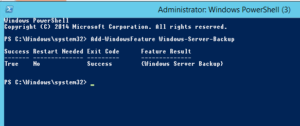
Came across issue – cant find “Server backup” via GUI – need to grab a copy of the system state file just in case.
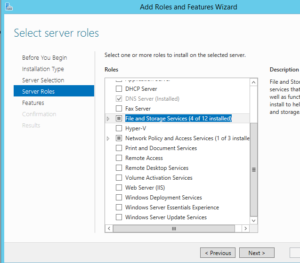
Install Windows Server Backup using Powershell:
1. The first line “get-windowsfeature *backup*” is in order to figure out the name of the backup feature to install.
2. Import Server-Manager
3. Add-WindowsFeature Windows-Server-Backup
4. Powershell output:
Sometimes angry IP scanner doesn’t play well.
I use GFI Languard Network Scanner
Note to self *works on Windows 10*
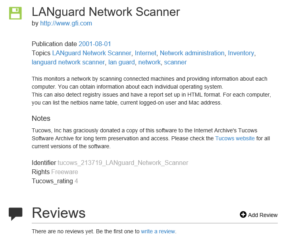
thank god for wayback machine
https://archive.org/details/tucows_213719_LANguard_Network_Scanner
https://kb.vmware.com/s/article/1008886
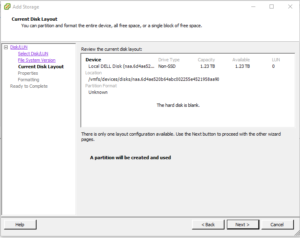
Pulled drive from SAN to reuse in Dell R720 ( 6 x 450 SAS > RAID 10 )
Add to Esx host – I get the following error

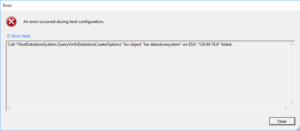
Notice how the “Next Button is greyed out”
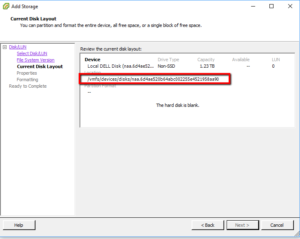

SSH into ESX Host;
ls /vmfs/devices/disks/ -all
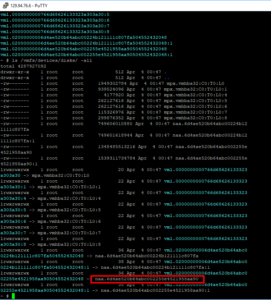
Confirm Disk !!!!
dd if=/dev/zero of=”/vmfs/devices/disks/naa.6d4ae520b64abc002255e4521958aa90” bs=512 count=34 conv=notrunc


For future reference
** note to self ** /31 is for point to point, ie wireless isp to client
| Bitmask (Bits) | Dotted Decimal | Hexadecimal | Binary |
|---|---|---|---|
| /0 | 0.0.0.0 | 0x00000000 | 00000000 00000000 00000000 00000000 |
| /1 | 128.0.0.0 | 0x80000000 | 10000000 00000000 00000000 00000000 |
| /2 | 192.0.0.0 | 0xc0000000 | 11000000 00000000 00000000 00000000 |
| /3 | 224.0.0.0 | 0xe0000000 | 11100000 00000000 00000000 00000000 |
| /4 | 240.0.0.0 | 0xf0000000 | 11110000 00000000 00000000 00000000 |
| /5 | 248.0.0.0 | 0xf8000000 | 11111000 00000000 00000000 00000000 |
| /6 | 252.0.0.0 | 0xfc000000 | 11111100 00000000 00000000 00000000 |
| /7 | 254.0.0.0 | 0xfe000000 | 11111110 00000000 00000000 00000000 |
| /8 | 255.0.0.0 | 0xff000000 | 11111111 00000000 00000000 00000000 |
| /9 | 255.128.0.0 | 0xff800000 | 11111111 10000000 00000000 00000000 |
| /10 | 255.192.0.0 | 0xffc00000 | 11111111 11000000 00000000 00000000 |
| /11 | 255.224.0.0 | 0xffe00000 | 11111111 11100000 00000000 00000000 |
| /12 | 255.240.0.0 | 0xfff00000 | 11111111 11110000 00000000 00000000 |
| /13 | 255.248.0.0 | 0xfff80000 | 11111111 11111000 00000000 00000000 |
| /14 | 255.252.0.0 | 0xfffc0000 | 11111111 11111100 00000000 00000000 |
| /15 | 255.254.0.0 | 0xfffe0000 | 11111111 11111110 00000000 00000000 |
| /16 | 255.255.0.0 | 0xffff0000 | 11111111 11111111 00000000 00000000 |
| /17 | 255.255.128.0 | 0xffff8000 | 11111111 11111111 10000000 00000000 |
| /18 | 255.255.192.0 | 0xffffc000 | 11111111 11111111 11000000 00000000 |
| /19 | 255.255.224.0 | 0xffffe000 | 11111111 11111111 11100000 00000000 |
| /20 | 255.255.240.0 | 0xfffff000 | 11111111 11111111 11110000 00000000 |
| /21 | 255.255.248.0 | 0xfffff800 | 11111111 11111111 11111000 00000000 |
| /22 | 255.255.252.0 | 0xfffffc00 | 11111111 11111111 11111100 00000000 |
| /23 | 255.255.254.0 | 0xfffffe00 | 11111111 11111111 11111110 00000000 |
| /24 | 255.255.255.0 | 0xffffff00 | 11111111 11111111 11111111 00000000 |
| /25 | 255.255.255.128 | 0xffffff80 | 11111111 11111111 11111111 10000000 |
| /26 | 255.255.255.192 | 0xffffffc0 | 11111111 11111111 11111111 11000000 |
| /27 | 255.255.255.224 | 0xffffffe0 | 11111111 11111111 11111111 11100000 |
| /28 | 255.255.255.240 | 0xfffffff0 | 11111111 11111111 11111111 11110000 |
| /29 | 255.255.255.248 | 0xfffffff8 | 11111111 11111111 11111111 11111000 |
| /30 | 255.255.255.252 | 0xfffffffc | 11111111 11111111 11111111 11111100 |
| /31 | 255.255.255.254 | 0xfffffffe | 11111111 11111111 11111111 11111110 |
| /32 | 255.255.255.255 | 0xffffffff | 11111111 11111111 11111111 11111111 |
Class address ranges:
Class A = 1.0.0.0 to 126.0.0.0
Class B = 128.0.0.0 to 191.255.0.0
Class C = 192.0.1.0 to 223.255.255.0
Reserved address ranges for private (non-routed) use:
10.0.0.0 -> 10.255.255.255
172.16.0.0 -> 172.31.255.255
192.168.0.0 -> 192.168.255.255
Other reserved addresses:
127.0.0.0 is reserved for loopback and IPC on the local host
224.0.0.0 -> 239.255.255.255 is reserved for multicast addresses
Chart notes:
Number of Subnets – “( )” Refers to the number of effective subnets, since the use of subnet numbers of all 0s or all 1s is highly frowned upon and RFC non-compliant.
Number of Hosts – Refers to the number of effective hosts, excluding the network and broadcast address.
Class A
Network Bits Subnet Mask Number of Subnets Number of Hosts
/8 255.0.0.0 0 16777214
/9 255.128.0.0 2 (0) 8388606
/10 255.192.0.0 4 (2) 4194302
/11 255.224.0.0 8 (6) 2097150
/12 255.240.0.0 16 (14) 1048574
/13 255.248.0.0 32 (30) 524286
/14 255.252.0.0 64 (62) 262142
/15 255.254.0.0 128 (126) 131070
/16 255.255.0.0 256 (254) 65534
/17 255.255.128.0 512 (510) 32766
/18 255.255.192.0 1024 (1022) 16382
/19 255.255.224.0 2048 (2046) 8190
/20 255.255.240.0 4096 (4094) 4094
/21 255.255.248.0 8192 (8190) 2046
/22 255.255.252.0 16384 (16382) 1022
/23 255.255.254.0 32768 (32766) 510
/24 255.255.255.0 65536 (65534) 254
/25 255.255.255.128 131072 (131070) 126
/26 255.255.255.192 262144 (262142) 62
/27 255.255.255.224 524288 (524286) 30
/28 255.255.255.240 1048576 (1048574) 14
/29 255.255.255.248 2097152 (2097150) 6
/30 255.255.255.252 4194304 (4194302) 2
Class B
Network Bits Subnet Mask Number of Subnets Number of Hosts
/16 255.255.0.0 0 65534
/17 255.255.128.0 2 (0) 32766
/18 255.255.192.0 4 (2) 16382
/19 255.255.224.0 8 (6) 8190
/20 255.255.240.0 16 (14) 4094
/21 255.255.248.0 32 (30) 2046
/22 255.255.252.0 64 (62) 1022
/23 255.255.254.0 128 (126) 510
/24 255.255.255.0 256 (254) 254
/25 255.255.255.128 512 (510) 126
/26 255.255.255.192 1024 (1022) 62
/27 255.255.255.224 2048 (2046) 30
/28 255.255.255.240 4096 (4094) 14
/29 255.255.255.248 8192 (8190) 6
/30 255.255.255.252 16384 (16382) 2
Class C
Network Bits Subnet Mask Number of Subnets Number of Hosts
/24 255.255.255.0 0 254
/25 255.255.255.128 2 (0) 126
/26 255.255.255.192 4 (2) 62
/27 255.255.255.224 8 (6) 30
/28 255.255.255.240 16 (14) 14
/29 255.255.255.248 32 (30) 6
/30 255.255.255.252 64 (62) 2
Class D
CIDR Block Supernet Mask Number of Class C Addresses Number of Hosts
/14 255.252.0.0 1024 262144
/15 255.254.0.0 512 131072
/16 255.255.0.0 256 65536
/17 255.255.128.0 128 32768
/18 255.255.192.0 64 16384
/19 255.255.224.0 32 8192
/20 255.255.240.0 16 4096
/21 255.255.248.0 8 2048
/22 255.255.252.0 4 1024
/23 255.255.254.0 2 512
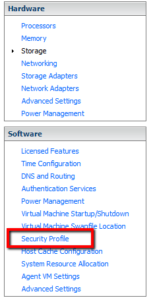
· First start the vSphere Client
· Select the ESXi host in the configurations tab
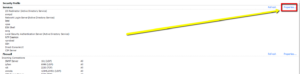
· Select Security Profile
· Click Properties

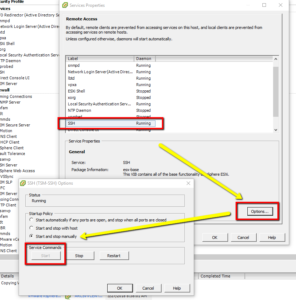
· Select SSH Services > Options > select “start up policy” > OK
** note to self; everyones on the latest and greatest **
This for my future reference, ie when I have to deal with apache based certs ( vs IIS )
Download and install windows port of OpenSSL here
** you will need to know your password if you password protect your cert **
Command to enter. 1st part ( extract the .key )
openssl

pkcs12 -in [yourfile.pfx] -nocerts -out [keyfile-encrypted.key]
eg
openssl pkcs12 -in d:\temp\star.name_of_cert_godaddy.pfx -nocerts -out d:\temp\star.name_of_cert_godaddy.key
** eg I have installed the openssl app in C, I have placed my temp cert in D:\temp
2nd part ( extract the .crt )
openssl

pkcs12 -in [yourfile.pfx] -clcerts -nokeys -out [certificate.crt]
eg
openssl pkcs12 -in d:\temp\star.name_of_cert_godaddy.pfx -clcerts -nokeys -out d:\temp\star.name_of_cert_godaddy.crt
Sometimes you need unencrypted key files
openssl

rsa -in [keyfile-encrypted.key] -out [keyfile-decrypted.key]
eg
openssl rsa -in d:\temp\star.name_of_cert_godaddy.key -out d:\temp\star.name_of_cert_godaddy.nopass.key
If you need it in PEM format
openssl

rsa -in [keyfile-encrypted.key] -outform PEM -out [keyfile-encrypted-pem.key]
openssl rsa -in d:\temp\star.name_of_cert_godaddy.nopass.key -outform PEM -out d:\temp\star.name_of_cert_godaddy.nopass.pem.key
note self – no more searching internet, see your own notes.