Blog

You can add Calendar Permissions Using Powershell for users using the following command

1#
$UserCredential = Get-Credential

2#
$Session = New-PSSession -ConfigurationName Microsoft.Exchange -ConnectionUri https://outlook.office365.com/powershell-liveid/ -Credential $UserCredential -Authentication Basic –AllowRedirection

3#
Import-PSSession $Session

4#
Get-MailboxFolderPermission user1.name:\calendar

#5
Add-MailboxFolderPermission user1.name:\calendar –user user2.name –accessrights reviewer
(ie above gives user2 reviewer rights to user1 calendar )

#6
Set-MailboxFolderPermission user1.name:\calendar –user user2.name –accessrights editor
(Replacing user.name with the user’s usernames)

#7
Remove-MailboxFolderPermission user1.name:\calendar –user user2.name

#8
Remove-PSSession $Session


Send on behalf of etc


if user2 needs to access user1’s calendar

Add-MailboxFolderPermission -identity “user1:\calendar” –user “user2” -AccessRights Reviewer

the same can be done to give permission to a security group

Add-MailboxFolderPermission -identity “user1:\calendar” –user “DomainName\securitygroup” -AccessRights Reviewer

Below is the list of access rights and explanation

None                                      FolderVisible
Owner                                    CreateItems, ReadItems, CreateSubfolders, FolderOwner, FolderContact, FolderVisible, EditOwnedItems, EditAllItems, DeleteOwnedItems, DeleteAllItems
PublishingEditor                  CreateItems, ReadItems, CreateSubfolders, FolderVisible, EditOwnedItems, EditAllItems, DeleteOwnedItems, DeleteAllItems
Editor                                      CreateItems, ReadItems, FolderVisible, EditOwnedItems, EditAllItems, DeleteOwnedItems, DeleteAllItems
PublishingAuthor                 CreateItems, ReadItems, CreateSubfolders, FolderVisible, EditOwnedItems, DeleteOwnedItems
Author                                   CreateItems, ReadItems, FolderVisible, EditOwnedItems, DeleteOwnedItems
NonEditingAuthor                CreateItems, ReadItems, FolderVisible
Reviewer                                ReadItems, FolderVisible
Contributor                     CreateItems, FolderVisible

Add-RecipientPermission user1@domain.com -AccessRights SendAs -Trustee user2@domain.com

Add-RecipientPermission user1@domain.com -AccessRights SendAs -Trustee user2@domain.com


Powershell AD-Sync

For my future reference – force AD sync to o365


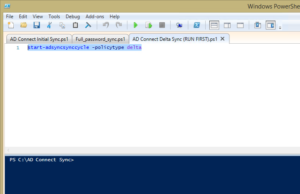
1 #  start-adsyncsynccycle -policytype delta


2 #   start-adsyncsynccycle -policytype Initial


3  #

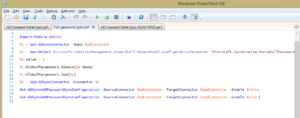
$adConnector  = “exampledomin.com”

$aadConnector = “exampledomain.onmicrosoft.com – AAD”

Import-Module adsync

$c = Get-ADSyncConnector -Name $adConnector

$p = New-Object Microsoft.IdentityManagement.PowerShell.ObjectModel.ConfigurationParameter “Microsoft.Synchronize.ForceFullPasswordSync”, String, ConnectorGlobal, $null, $null, $null

$p.Value = 1

$c.GlobalParameters.Remove($p.Name)

$c.GlobalParameters.Add($p)


$c = Add-ADSyncConnector -Connector $c


Set-ADSyncAADPasswordSyncConfiguration -SourceConnector $adConnector -TargetConnector $aadConnector -Enable $false


Set-ADSyncAADPasswordSyncConfiguration -SourceConnector $adConnector -TargetConnector $aadConnector -Enable $true


Adobe Premiere CC 2018 wont open on a MAC

Ran into this issue today –

First,  I tried :

Search for and open “Activity Monitor” then close all of the Adobe applications in Activity Monitor.

Search for and open “Finder” , click on Go tab and select > Go to Folder.


Location 1: In the box type ~/Library/Application Support.

Location 2: In the box type ~/Library/Preferences.

Location 3: Documents folder

Renamed the ‘Adobe‘ folders to ‘OldAdobe


Launch Premiere Pro, accept the License Agreement and see if it works.

Note: You will lose your customized workspaces and keyboard shortcuts.


This didn’t work for me 🙁 but doing the following did 🙂


Open finder > Go tab > Go to Folder

Type “~/Library” and click Go.

Go to /Library/Caches/Adobe/Premiere Pro/12.0

Delete the “Typesupport” folder


Then Premiere opened and stayed open and loaded.

Delete EFI partition on USB drive in windows


Press “Windows Key + R to open the run dialogue box,

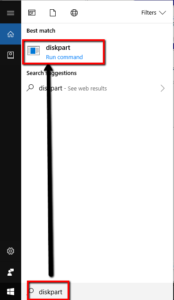
Type“diskpart” and double click “Diskpart – run command” to open a command prompt window.


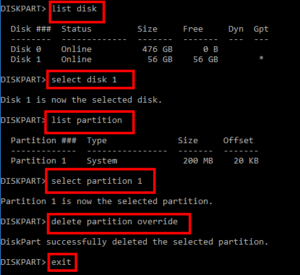
Type “list disk” > Enter

“select disk n” ( where n = disk number ) > Enter

Type “list partition” to display all the volumes on the hard drive.

Type “select partition n” ( n stands for the volume ).

Type “delete partition override” to remove the EFI partition.

Type “exit” to close the diskpart window


Install Windows Server Backup 2012R2

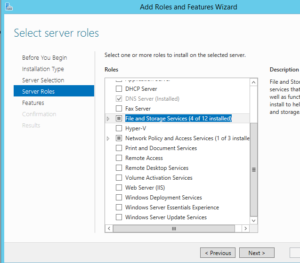
Came across issue – cant find “Server backup” via GUI – need to grab a copy of the system state file just in case.


Install Windows Server Backup using Powershell:

1.      The first line “get-windowsfeature *backup*” is in order to figure out the name of the backup feature to install.

2. Import Server-Manager

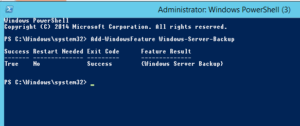
3. Add-WindowsFeature Windows-Server-Backup

4.      Powershell output:


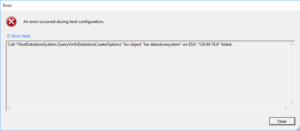
Call “HostDatastoreSystem.QueryVmfsDatastoreCreateOptions” for object “ha-datastoresystem”

https://kb.vmware.com/s/article/1008886

Pulled drive from SAN to reuse in Dell R720 ( 6 x 450 SAS > RAID 10 )

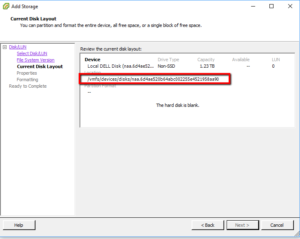
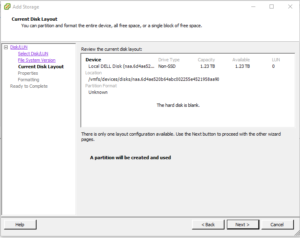
Add to Esx host – I get the following error


Notice how the “Next Button is greyed out”    

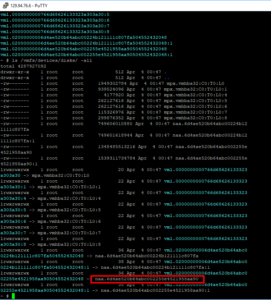
SSH into ESX Host;

ls /vmfs/devices/disks/ -all


Confirm Disk !!!!


dd if=/dev/zero of=”/vmfs/devices/disks/naa.6d4ae520b64abc002255e4521958aa90” bs=512 count=34 conv=notrunc


CIDR – Network Conversion

For future reference

** note to self ** /31 is for point to point, ie wireless isp to client

Bitmask (Bits) Dotted Decimal Hexadecimal Binary
/0 0.0.0.0 0x00000000 00000000 00000000 00000000 00000000
/1 128.0.0.0 0x80000000 10000000 00000000 00000000 00000000
/2 192.0.0.0 0xc0000000 11000000 00000000 00000000 00000000
/3 224.0.0.0 0xe0000000 11100000 00000000 00000000 00000000
/4 240.0.0.0 0xf0000000 11110000 00000000 00000000 00000000
/5 248.0.0.0 0xf8000000 11111000 00000000 00000000 00000000
/6 252.0.0.0 0xfc000000 11111100 00000000 00000000 00000000
/7 254.0.0.0 0xfe000000 11111110 00000000 00000000 00000000
/8 255.0.0.0 0xff000000 11111111 00000000 00000000 00000000
/9 255.128.0.0 0xff800000 11111111 10000000 00000000 00000000
/10 255.192.0.0 0xffc00000 11111111 11000000 00000000 00000000
/11 255.224.0.0 0xffe00000 11111111 11100000 00000000 00000000
/12 255.240.0.0 0xfff00000 11111111 11110000 00000000 00000000
/13 255.248.0.0 0xfff80000 11111111 11111000 00000000 00000000
/14 255.252.0.0 0xfffc0000 11111111 11111100 00000000 00000000
/15 255.254.0.0 0xfffe0000 11111111 11111110 00000000 00000000
/16 255.255.0.0 0xffff0000 11111111 11111111 00000000 00000000
/17 255.255.128.0 0xffff8000 11111111 11111111 10000000 00000000
/18 255.255.192.0 0xffffc000 11111111 11111111 11000000 00000000
/19 255.255.224.0 0xffffe000 11111111 11111111 11100000 00000000
/20 255.255.240.0 0xfffff000 11111111 11111111 11110000 00000000
/21 255.255.248.0 0xfffff800 11111111 11111111 11111000 00000000
/22 255.255.252.0 0xfffffc00 11111111 11111111 11111100 00000000
/23 255.255.254.0 0xfffffe00 11111111 11111111 11111110 00000000
/24 255.255.255.0 0xffffff00 11111111 11111111 11111111 00000000
/25 255.255.255.128 0xffffff80 11111111 11111111 11111111 10000000
/26 255.255.255.192 0xffffffc0 11111111 11111111 11111111 11000000
/27 255.255.255.224 0xffffffe0 11111111 11111111 11111111 11100000
/28 255.255.255.240 0xfffffff0 11111111 11111111 11111111 11110000
/29 255.255.255.248 0xfffffff8 11111111 11111111 11111111 11111000
/30 255.255.255.252 0xfffffffc 11111111 11111111 11111111 11111100
/31 255.255.255.254 0xfffffffe 11111111 11111111 11111111 11111110
/32 255.255.255.255 0xffffffff 11111111 11111111 11111111 11111111

Class address ranges:

Class A = 1.0.0.0 to 126.0.0.0
Class B = 128.0.0.0 to 191.255.0.0
Class C = 192.0.1.0 to 223.255.255.0

Reserved address ranges for private (non-routed) use:

10.0.0.0 -> 10.255.255.255
172.16.0.0 -> 172.31.255.255
192.168.0.0 -> 192.168.255.255

Other reserved addresses:

127.0.0.0 is reserved for loopback and IPC on the local host
224.0.0.0 -> 239.255.255.255 is reserved for multicast addresses

Chart notes:

Number of Subnets – “( )” Refers to the number of effective subnets, since the use of subnet numbers of all 0s or all 1s is highly frowned upon and RFC non-compliant.
Number of Hosts – Refers to the number of effective hosts, excluding the network and broadcast address.

Class A
Network Bits Subnet Mask Number of Subnets Number of Hosts
/8 255.0.0.0 0 16777214
/9 255.128.0.0 2 (0) 8388606
/10 255.192.0.0 4 (2) 4194302
/11 255.224.0.0 8 (6) 2097150
/12 255.240.0.0 16 (14) 1048574
/13 255.248.0.0 32 (30) 524286
/14 255.252.0.0 64 (62) 262142
/15 255.254.0.0 128 (126) 131070
/16 255.255.0.0 256 (254) 65534
/17 255.255.128.0 512 (510) 32766
/18 255.255.192.0 1024 (1022) 16382
/19 255.255.224.0 2048 (2046) 8190
/20 255.255.240.0 4096 (4094) 4094
/21 255.255.248.0 8192 (8190) 2046
/22 255.255.252.0 16384 (16382) 1022
/23 255.255.254.0 32768 (32766) 510
/24 255.255.255.0 65536 (65534) 254
/25 255.255.255.128 131072 (131070) 126
/26 255.255.255.192 262144 (262142) 62
/27 255.255.255.224 524288 (524286) 30
/28 255.255.255.240 1048576 (1048574) 14
/29 255.255.255.248 2097152 (2097150) 6
/30 255.255.255.252 4194304 (4194302) 2

Class B
Network Bits Subnet Mask Number of Subnets Number of Hosts
/16 255.255.0.0 0 65534
/17 255.255.128.0 2 (0) 32766
/18 255.255.192.0 4 (2) 16382
/19 255.255.224.0 8 (6) 8190
/20 255.255.240.0 16 (14) 4094
/21 255.255.248.0 32 (30) 2046
/22 255.255.252.0 64 (62) 1022
/23 255.255.254.0 128 (126) 510
/24 255.255.255.0 256 (254) 254
/25 255.255.255.128 512 (510) 126
/26 255.255.255.192 1024 (1022) 62
/27 255.255.255.224 2048 (2046) 30
/28 255.255.255.240 4096 (4094) 14
/29 255.255.255.248 8192 (8190) 6
/30 255.255.255.252 16384 (16382) 2

Class C
Network Bits Subnet Mask Number of Subnets Number of Hosts
/24 255.255.255.0 0 254
/25 255.255.255.128 2 (0) 126
/26 255.255.255.192 4 (2) 62
/27 255.255.255.224 8 (6) 30
/28 255.255.255.240 16 (14) 14
/29 255.255.255.248 32 (30) 6
/30 255.255.255.252 64 (62) 2

Class D
CIDR Block Supernet Mask Number of Class C Addresses Number of Hosts
/14 255.252.0.0 1024 262144
/15 255.254.0.0 512 131072
/16 255.255.0.0 256 65536
/17 255.255.128.0 128 32768
/18 255.255.192.0 64 16384
/19 255.255.224.0 32 8192
/20 255.255.240.0 16 4096
/21 255.255.248.0 8 2048
/22 255.255.252.0 4 1024
/23 255.255.254.0 2 512

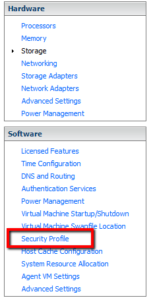
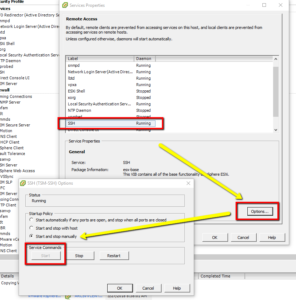
Enable SSH on ESXI 5 , via the VSPHERE Client

·         First start the vSphere Client

·         Select the ESXi host in the configurations tab

·         Select Security Profile


·         Click Properties


·         Select SSH Services > Options > select “start up policy” > OK


** note to self;  everyones on the latest and greatest **